Translate

11 Mar 2015

Herb Chicken


Hi everybody,
Today I will share my herb chicken recipe. I have been making variations of this recipe for over 2 years now. Every time I cooked it, it would turn out different and sometimes really blah.... ๐Ÿ˜‚ I tried various permutations and combinations of ingredients, and so this recipe is an evolved one.
One major concern on my mind is that many readers prefer to use an oven rather than a stove top for cooking. This is an obstacle I have to overcome since the traditional method for cooking in my country is heavily skewed towards stove top cooking. It would be wrong for me to give temperature and time for oven roasted recipes, when I am not too sure myself, and often find myself looking up temperature and cook time online for basic recipes. Over time I hope to get used to it, but for now, I will show you what I know best, and think worthy of blogging from my viewpoint.
Here goes... my patient readers...hope you try it out soon.
 Simple ingredients:

  • Any cut of chicken (on the bone) I have photographed only half the amount of chicken here... Actually, I have used about 1 kilo of chicken tangri.
  • Some olive pomace oil (suitable for cooking) or any vegetable refined oil is also fine.
  • Dark soy
  • 2 medium sized red onions
  • 2 medium sized tomatoes
  • Some fresh chilly of you choice (I have used cherry pepper)
  • Most importantly, a bunch of fresh dhania patta(coriander leaves) and some garlic shoots/scapes. 
Start by using a kitchen towel/paper to pat dry the chicken well. In a deep pan, add in 3/4th of a cup of oil to poach the chicken. Put your chicken in when the oil is cold and cover it with a lid. Start with high heat.

Let the chicken poach in the oil for about 5 minutes on high heat or till it gets a slightly golden color on one side, and then turn it over gently. Put the lid on again and leave it for 5 more minutes on the other side. After this, lower the heat to allow the chicken to cook slowly from the bone. (10 minutes on low heat with a lid)

This is still not enough to cook the chicken thoroughly, so do not feel tempted to try a bite๐Ÿ˜‰

While the chicken was bathing in oil, I used the time to prepare the veggies. Slice the onion, tomatoes and chilly (anyway you find comfortable... But try to make them small for easy cooking) 
Wash the fresh herbs thoroughly and give them a rough chop...I use a pair of scissors for this.

 After your chicken is ready, do not discard the remaining oil, use the same pot for the next stage as it will enhance the taste in my opinion. (Do not remove excess oil at this stage)
Crank up the heat and throw in the sliced onion and chilly together...giving them a good toss.... Wait till light golden.

Once they turn to a light golden color, throw in the fresh herbs and give it a good mix. The aroma is heavenly.
Once the herbs are mixed well and begin to change color add in the tomatoes, 2 tablespoons of dark soy and salt to taste.

Spread the veggies evenly on the base of the pot and add in your chicken. Give it a good toss and let the veggies and oil coat the chicken well. I like to add a few pinched of red chilly powder here for a good colour.

Now put a lid on the pot and leave it on low heat for 15 to 20 minutes (if you are using large chunks keep them for at least 20 minutes, if you are using small sized pieces 15 minutes and if boneless then 7 to 8 minutes should be fine). For the last 3 minutes or so, increase the heat and open the lid to allow the chicken to develop some beautiful reddish golden colour. Once done, let the chicken rest in the pot with the lid on for about 10 minutes minimum.


You may remove the excess oil now. I don't remove it because I enjoy this chicken with a good helping of fluffy white rice (and this is why I prefer using olive oil over refined vegetable oil). Easy and yummy... Good luck and remember to cook from your heart❤


22 Feb 2015

Chayote khuri(rolls)

Hello hungry readers☺
Today I will demonstrate the making of iskus khuri (chayote rolls) which is an easy and healthy breakfast and can also be easily carried in a tiffin box for lunch. I love it when we have khuri for midmorning snack with some Makaibari tea (from Darjeeling) on the terrace ...just family and sometimes an occasional guest who happens to drop in to say hello!

Iskus or chayote is a delicious creeper vegetable that is very high in water content and almost every part of this plant is edible. (For the purpose of this recipe we will only use the fruit though.) Most people from  north east India where I am from, look down upon this vegetable because it is available in abundance and is very cheap too...worse, potato lovers somehow seem to dislike the fact that even though iskus looks like aloo(potato) when cooked, the texture is completely different. I, however urge you to give this vegetable a try. It works beautifully in vegetable momos and also stews well with beef.

Preparation 
Peel and slice the iskus as shown below...try to keep the pieces long and thin and roughly the same size. I have used 2 of them.

Next, slice one large tomato, a few green chillies, and one large red onion.


Now simply follow the picture guide to make the stuffing.
 Pour in some vegetable oil in a deep pan and  throw in the chilli before the oil is hot...this flavours the oil and gives it a nice fragrance. Once it begins to crackle, it's time for the red onion. When the onion begins to turn golden brown, add in the tomato and salt to taste. (Season it well, most bad dishes are bad due to poor seasoning)
  After a minute or two, when the tomato is cooked and has blended in well with the rest of the ingredient, it is time for the iskus.(salt helps it break down)
 Now, add in the vegetable, lower the heat to a medium and put on a lid. Give it a quick mix after 3 or 4 minutes and cover again.
 After about 10 to 12 minutes, it will become translucent and soft ...at this point, lower the heat to the minimum possible and roughly chop up some coriander leaves.
  Add the coriander to the dish.
 Turn of the heat, give it a good mix and let it rest aside, while you make the outer shell for the roll.

This part of the dish is a bit tricky but don't worry it should be fine as long as you follow the guide.  We usually make a buckwheat flour batter but since it is very difficult to make them, thin I am going to make an easier batter that is almost difficult to ruin.

Using 1 and half cup of all purpose flour and 4 cups of water, make a thin and runny batter. Add a pinch of salt.

Sorry for the bad video quality (I don't know what went wrong as the video was perfectly alright on my phone)
First make sure the pan is hot but not smoking hot... Just a few drops of oil and using a ladel, pour the batter on to the pan, quickly giving the pan a swirl so as to uniformly spread the batter.
Use a spatula to gently separate the sides from the pan and once the batter firms up it will automatically separate when you shake the pan.

Flip it over using a spatula or without if you can.  The other side will look uneven... Lower the heat and let it cook in this position.. The smooth surface on the bottom will brown slightly as it cooks. It takes just about a minute or two depending on how thin you have managed to make them..remember that if the batter is too thick it will just not spread!!
Stack them up on a plate nearby. Once you're done, take them one by one and placing the smooth side down, add the fillings as shown below. At this stage the filling should have cooled down...don't worry..  this is best served cold.
 Roll it up and  gently place them on a plate..don't worry they will not open up.
 Stack them on a plate and let them sit for at least 10 minutes... They will stick better and not open up while eating.

The paste adds a garlicky pungency that just combines so well with the herby coriander in the rolls.
 Pack them up for lunch at work or for the kids. You can even cut them up and serve for ease!!


You can add thin shreds of chicken breast to your roll... Not large chunks though... Or even some mushrooms... If the crepe is too difficult to make.. Eat the vegetable with any bread or roti you like. 
Enjoy eating khuri and remember to cook from your ♥ !


29 Jan 2015

seylabhu (radish pickle)


I am so happy to be writing this post for 2 reasons...firstly because I believe in this recipe wholeheartedly and secondly because I can do this 3 days earlier than I planned.

Seylabhu is a water based radish pickle which is similar in taste to kimchi. Simple and cheap, crunchy and sour, smelly yet healthy and my favourite form of palate cleansing!!

I am always on a lookout to share  recipes that students can try out, and this is perfect!!


Ingredients
  • 1 kg of Pink radish (long ones or round ones)
  • Half kg red onions
  • Dried red chilli ( I have used 20 grams)
  • Thumb size dried ginger(more if fresh ginger)
  • Water 
  • 2 tbsps of salt
Just follow this picture tutorial
Peel and quarter red onions.


Peel and slice ginger.

Remove the tops and soak the dried chillies

Slice the radish into similar sized discs and don't forget to wash them thoroughly before slicing.

Throw all of the above into an airtight jar and add 2 tbsps of salt.


Pour in cold drinking water till the brim covering all the ingredients.


Surprise** not surrise ...human error which cannot be edited(lol). The  temperature here ranges between 10 degrees and 14 degrees celcius... and it took 4 days for this seylabhu to become eatworthy ... may differ from place to place. Remember to keep it away from direct sunlight and look out for pink coloured water to know when it's ready!! Once it is perfect, store it in the fridge to prevent it from fermenting too quickly.


The radish will have lost it's beautiful pink pigment on the skin to the entire jar of crunchy and refreshing goodness. Beware of the smell...hajmola anyone? 

Best served with masubhat (rice and red meat curry) Enjoy making Seylabhu and remember to cook from your heart!!

26 Jan 2015

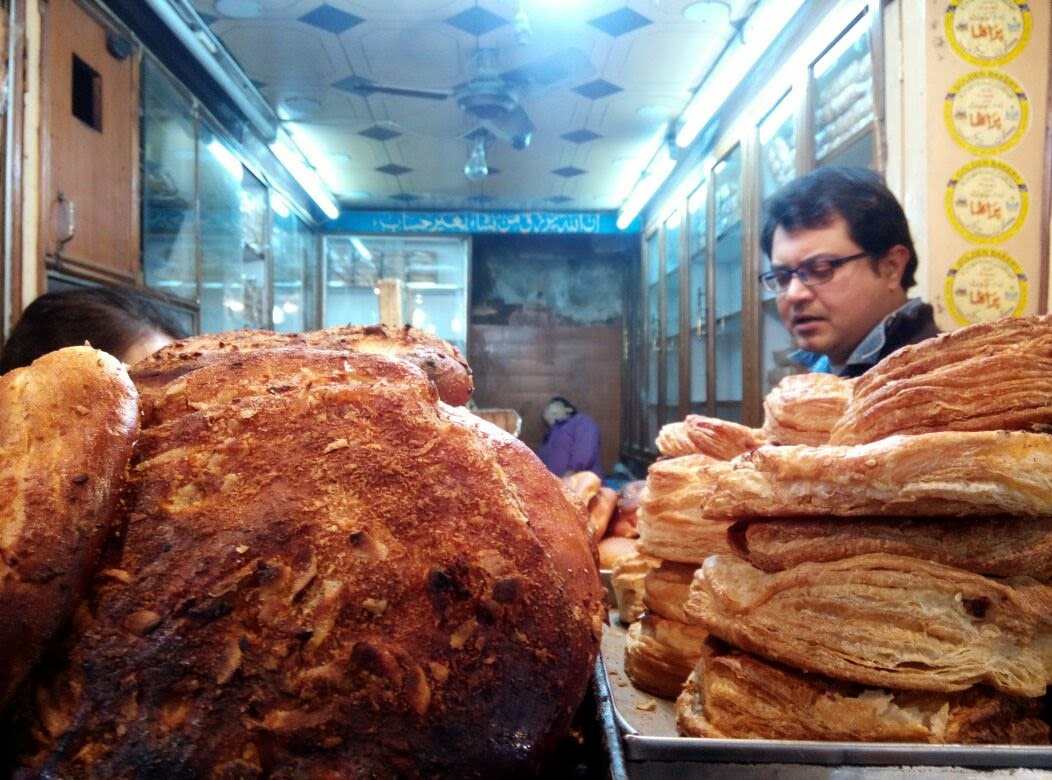
delhi delights: golden bakery

Happy republic day!!
This is my first Review Post and I hope you enjoy reading this as much as I loved writing it!!
I decided to explore old Delhi today, curious about local bakeries that still bake goodies in makeshift coal ovens and though some have moved on to commercial ovens...they still manage to have an old world charm in taste and style.

The weather was particularly against an outing on the streets and light showers in the morning made it tough to navigate through the slush of kebab gali which opens up directly opposite gate number 1 of the famous Jama Masjid.
Among many others, I decided to taste something from this hole in the wall which called itself 'golden bakery' and  their tag line did indeed hold true!! The man at the counter seemed to be chatty and was generous enough to let me taste a variety of options before I decided on a few to take home with me... all in all, the experience was humbling.... and this I say because neither is this area clean nor do these bakeries have awesome state of the art bakeware and layout and still everyone seemed cheerful!!!

The coconut paratha
This is a sweet, flat bun that is close to a sweet focaccia. Best part of eating it was it's crunchy coconut crust and chewy sweet centre. 
Rs.25/- 


The cake rusk
All of us are familar with rusk and chai...especially elaichi rusk we find at every other stop in India. This is it's cousin, richer and softer because of the eggs and butter in it. This one had a perfect amount of sugar... actually just mildly sweetened. If you are a fan of home made plain cakes. ..you definitely need to try this.
Rs.300/kg


The plain cookie
This simple guy was selected for it's simplicity... don't you just want to dunk them in a glass of cold milk? 
Rs.200/Kg


The macaroon
I know ...I know... but the owner called them macaroons ...I had a good laugh, yet couldn't resist buying them for the sake of reliving old memories. These have coconut in them and are quite popular in my state...atleast they were around 10 years back when I was in middle school. You either love it or hate it... chewy and sweet with more than just a hint of coconut. 
Rs.200/kg


The nan khatai
These are different from the nan khatais you find on the streets all over delhi, especially at paharganj.
These here are makhan nan khatais and go very well with a large mug of coffee. The nan khatai is an Indian delight, sadly a dying art due to impacts of a post liberalised India which has resulted in a globalised food scene. This can very well be a reason for me to visit golden bakery once more before I leave Delhi !!
Rs. 300/kg

Sometimes you find the most amazing eats at the most unexpected places. I always associated old Delhi with mughlai food but I am glad I gave this bakery a shot, despite the terrible weather. It was an amusing experience and I am now lots of cookies richer!


18 Jan 2015

Mac and Cheese and a twist !!

hello 2015!!
The first month is almost over and here I am with my first post of this beautiful year...indication that I have a life after all.
Macaroni and Cheese, an American classic not from a box but using fresh ingredients!!


First the pasta
  • 200 grams elbow pasta (macaroni) 
  • some water to boil it in.
bring 4 cups of water to a boil and add in your pasta. Follow the instructions on the packet for boiling time and reduce the time just a bit so that they don't overcook. Drain and place under cold running water in a colander to stop the cooking process. Keep them aside and start with the sauce.


Bechamel sauce, is a basic sauce of french origin, easy to make and versatile in application.
  • 70 grams of butter
  • quarter cup plain flour
  • 4 Cups of milk
  • cheese mixture (I am using cheddar and parmesan ) 
  • pinch of salt (to lift the flavours of the cheese)
In a saucepan, on low heat, throw in your butter making sure it doesn't burn. Once it's melted, gently add in the flour, whisking. Once the paste turns golden, add in some simmering warm milk (cold milk will result in a lumpy sauce). Keep over low heat for a while till you have the correct consistency you want. Remove from the heat and add in grated cheese (I find it easy to grate cheese using a potato peeler as there is less wastage and easier for the thin shavings to melt in the sauce.)
Whisk gently till the cheese melts in the hot sauce. Once you have a smooth sauce, add in your pasta to the hot sauce. I totally forgot to take pictures of these steps as I was using one hand to work and another to take pictures!!


Slice up some smoked chicken and fry them in a glug of oil...you can definitely replace this with bacon or even some smoked sausages!!


Give it a rough chop

Serve your mac and cheese with a drizzle of smoked chicken and some shavings of parmesan. If you have an oven, you can bake this dish with some bread crumbs on top, which is common american style of completing this comfort food!!


 I, however decided to bake them in spring roll pastry I bought last week which was waiting to be thawed and used in my freezer!!


  • Pastry
  • some water or an egg to seal the corners of the pastry while rolling
  • cold mac and cheese.


Keeping one corner pf the pastry towards you, spoon in some mac and cheese

 fold as shown below and seal ussing eggwash or water.


After this step, it will look like an envelope, Give the last corner an eggwash and  just roll it away from you to make cute rolls.


These are generally deep fried, but I decided to bake them out of curiosity ,,, gave them each a lavish eggwash (bath more like) and baked them for 15 minutes at 250 degrees, turning them around for good colour as required.

They turned out to be a success... was happy with myself... light crunchy bites with gooey cheesy center... "need to fill these up with bananas and nutella, next time for sure" is what ran through my mind!!
 Enjoy them while they are hot !!

I hope this recipe makes you happy, hungry and motivates you to cook tonight. Enjoy, have a great 2015 and remember to cook from your heart!!